Call to Create, Add, and Edit Custom Fields in QuickBooks Online Advanced With the QuickBooks

Read below to learn how you can create and use enhanced custom fields in QuickBooks Online Advanced.

The information that matters most to you and your customers will be tractable through Custom fields.

QuickBooks Online Advanced will allow you to create custom fields for almost anything: sales reps, birthdays, or information unique to your industry. They can be added to sales forms, purchase orders, and customer profiles. It will help you receive better data and more detailed financial reports.

Kindly Note: Are you interested in using this feature? You can upgrade to QuickBooks Online Advanced.

QuickBooks Mobile App still doesn’t yet supports Enhanced custom fields. However, you can continue to use the old experience on mobile.

Step 1: Create custom fields

Step 2: Edit your custom fields

Custom fields page will help you edit your custom fields .

https://123intuit.com/

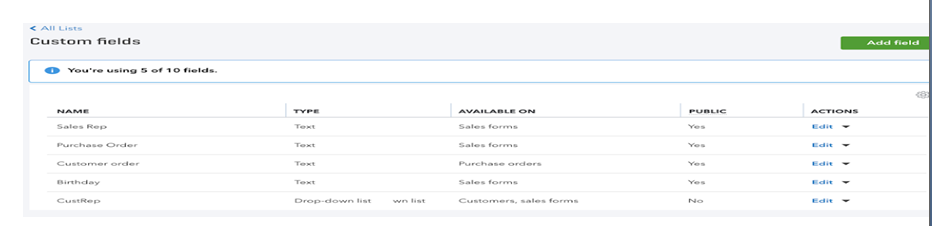
Select Edit to change a custom field’s name, type, or visibility to customers and vendors, in the Actions column. Any edits that you make here will apply to all sales forms, purchase orders, and customer profiles using the field.

You are allowed to create as many custom fields as you desire and have 10 active fields at a time. How you can make a field active or inactive:

  1. Select the arrowin the Actions column (available next to Edit option).
  2. Select Make active(or Make inactive).
There’s no need to worry about losing old custom field data

If you are making a custom field inactive, your past data won’t disappear. You’ll still see the field on sales forms and purchase orders you used it on, but it won’t be contained in new forms.

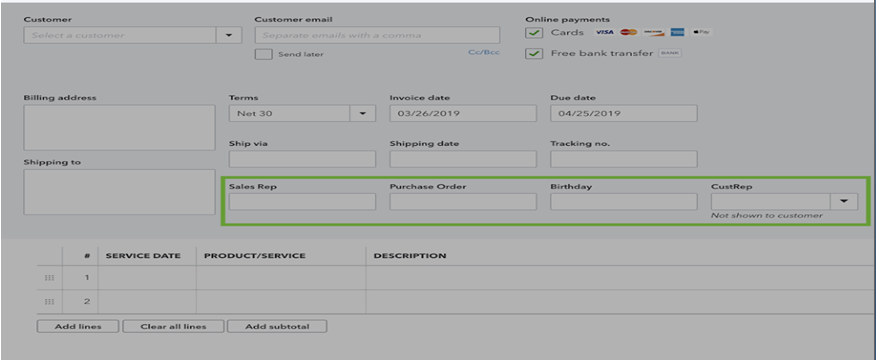
Step 3: Editing custom fields from forms and profiles

Custom fields can also be edited from sales forms, purchase orders, and customer profiles.

From sales forms (invoices, sales receipts, expenses) and purchase orders:

  1. Select Create (+), or Open an existing sales form to create a new one.
  2. Select the Gearicon at the top of the form (not the Gear menu on the main navigation bar).
  3. In the Custom Fieldssection, select + Add custom field to add a new field.
  4. Select the pencil icon next to a field name to bring up the Custom fields page to make edits.

https://123intuit.com/

Note: Keep in mind; Making any changes on forms affect all forms and customer profiles using the custom field and not just this form.
  1. Select the Gearicon again to close the window.

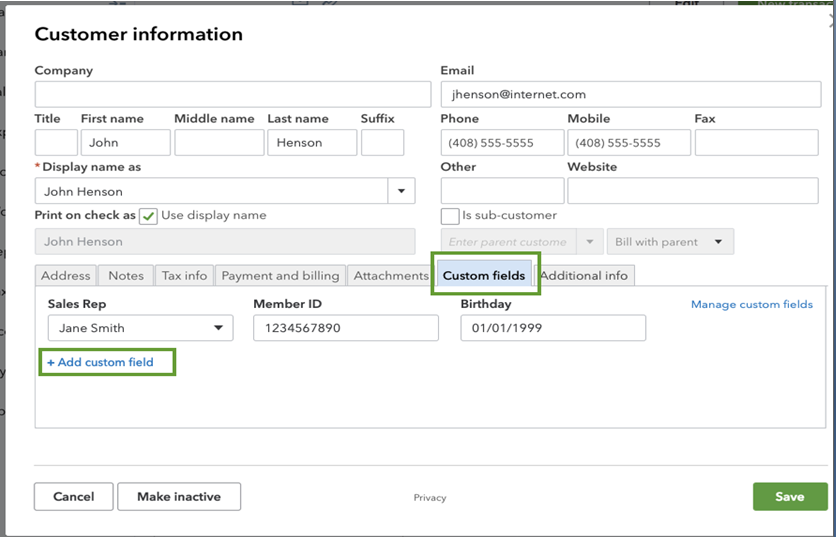
From customer profiles:

  1. Open the Sales menu from the navigation bar.
  2. Go to the Customers
  3. Find a customer profile and open it.
  4. Select Edit.
  5. Go to the Custom fields
  6. Select + Add custom field to add a new field.
  7. Select Save to save your changes.

https://123intuit.com/

These above steps will help you to Create, Add, and Edit Custom Fields in QuickBooks if you have any hassles while following these steps call QuickBooks Customer Support USA

Avail QuickBooks Support To Fix Issues Of Internet Set Up Wizard

123intuit.comSurely, you should connect internet through an internet service provider (ISP) in the PC. Your working computer must be connected to a local area network (LAN). If you are able to surf internet and finding various content on your Google on your PC, means you are connected to the internet. However, you do not need internet to use QuickBooks software, but “being online” will certainly double the power and flexibility of your software. It will give you an advantage of Internet & features inbuilt in QuickBooks.

Think about the following possibilities:

• Discover the new opportunities with QuickBooks’ connected services from the Company menu and select “Business Services Navigator”.

• Receive updates of QuickBooks and perform accordingly to get an awesome experience of usage.

• If you are a signed user for the QuickBooks Payroll then you can download the latest tax tables.

Are you a new user?

As you install QuickBooks software, you are prompted to activate the program, and if you wish to do so online, QuickBooks guides you set up your Internet connection. It’s a perfect idea to activate as soon as possible so that you could start using all of the QuickBooks online features.
Features

If you haven’t activated your copy of QuickBooks so far after installation, then you may do it any time by selecting Activate QuickBooks from the File menu. If you are unable to see Activate QuickBooks under the File menu, means QuickBooks is already activated.

Are you an upgrader?

If you have an older installed version of QuickBooks, then for your information new software uses the same Internet settings as the previous version. In case, you altered your internet service provider between then and now or switched from using a modem to using a direct connection (for example, cable or DSL) then you can change your setting manually.

How to set up an Internet connection:

Go to help menu, select Internet Connection Setup.

If you have not used QuickBooks before, then first you need to go online, to activate your software, QuickBooks automatically launches the Setup wizard of internet connection.

Follow all the instructions shown by setting up wizard. If you need help anytime, click to help, or click done, if you have successfully done it.

Changing an Internet connection

If you are already connected to the Internet, then you can modify the connection settings.

You may also fix some other ways so that QuickBooks could connect to the Internet. So, it will give you an alternate option to connect with the Internet, if your regular connection is down for any reason.

QuickBooks Support service experts provide you assistance regarding the internet connection set up wizard, you can contact to the support team or you can write a mail @ support@quickbooksupport.net

Call QuickBooks Support at To Reduces Complexities Of Accountancy

123intuit.com

Whether you are hosting QuickBooks support or any other application, the twists and expenses on such software could be curtailed. The importance of QuickBooks hosting has augmented due to redoubling expenses of specialized software which have gone out the price range from the small to medium sized businesses. Even the expanded complexities of software have led to the overburden of expenditure in distributing the software to end-users.

Very simple QuickBooks software stores data files and accessed and run on the particular servers, more than the local desktop. Just you need a good connectivity of the internet to use and run the QuickBooks application and data files. Hosting this software in a way in which accountants could prove their proficiency.

QuickBooks support software hosted by a dedicated server forge it more reliable and flexible so that users can log in from any worldwide location and could work along with the same file.

QuickBooks support is an upstart and a clear example of the newest innovation of man-made machines. With this application host do not need to concern about the backups of data on a daily basis on the dedicated servers and may keep the backup data for 30 days around.

Now concerning about data lost is a history with an installed QuickBooks or any other software on a dedicated server.

QuickBooks plug ins are easily added to the dedicated servers and also, easily synced with QuickBooks software.

Generically hosting this with a dedicated server atmosphere has no problem because it functions quite okay with more additional advantages.

The program permits you to host QuickBooks Pro, all the premier versions and enterprise editions and all QuickBooks add-ons.

One more important consideration is about security while choosing a hosting provider for your application and data, thus, always select the cheapest and best trustful hosting provider for hosting QuickBooks or any other software.

A good hosting service provider consists below inherent qualities.

• Don’t need to worry about data loss

• Quicker return on investment

• Easy learning without curve

• Easy to handle

• Reduce marketing and IT support expenses

• Minimize software and hardware costs

• Auto updates

• 24×7 service support

This application support is hosted and powered by the remote cloud infrastructure and could be accessed worldwide via the internet. QuickBooks hosting bestows the same functions as its locally installed software and also auto updating is very easy.

Such software may also be known as the Internet-based applications, Web application, and online applications, however, these terms often have a large scope when to think about hosting in a broader way. QuickBooks Support has successfully served a multitude of clients worldwide.

How Quickbooks Support will Help User To Resolve Error -6000,-83

quickbooks support 2019

Today in this Article we will talk about the cause of this error and also how to fix this error with the help of Quickbooks Support Experts Team. This Error Normally occurs when user try to open company file with in the software or when user double click on the software.

Reason For this error : 

This error might come due to following reason : 

1. when user is using Quickbooks on Multi user environment

2. when There is few missing files in the installation of Software

3. Might have few permission missing in windows user or Qb dataeserviceuserxxx

4. Firewall may not be configured or may be blocking Company Files

5. Extensions in company file might be damaged

6. Quickbooks Database Manager is not installed on the Main Server

How To Fix This Error

1. Download and install Quickbooks file doctor to Fix this error, you can visit on www.quickbooksupport.net for more information

2. If you have created any backup last time try to restore your old back up file

3. If you have installed Antivirus on your machine lower down the security of Antivirus

4. Try to restore your .Adr File

5. Switch off windows firewall

These above steps will help you resolve error if this steps doesn’t work call QuickBooks Customer Support

Call QuickBooks Support To Reconcile a Bank or Credit Card Account

123intuit.com

When it comes to reconciling bank or credit card account, most of the others are found in a confused state to analyze why reconciling is so important. Usually, an enterprise has to keep up a valid record of income as well as expense for analyzing recent credit card or bank account activities. In case, the process of reconciliation is not executed in the software properly then how can one assure that the available financial reports are accurate? That’s the main reason why the demand to reconcile a bank or credit card account is emerges as suggested by well-certified QuickBooks Support professionals.

For the purpose of initiating the procedure employed for reconciling your bank or credit card, follow the given steps in a proper way.

Step a) Initially, you have to select Banking from QuickBooks Menu Bar. It will open Begin Reconciliation pop up window in front of you.

Step b) Now, from the Account drop-down list, you need to select a correct account, such as, a balance sheet account type which you are wishing to reconcile.

Step c) At this stage, make sure to select the correct date in accordance with the ending date present in the QuickBooks financial institution by ensuring, whether it is matching to the Beginning Balance Number in the financial institution or not.

Step d) After above step, enter ending balance in the available field, according to the financial institution’s proud statement. Additionally, you can update any sort of Interest Earned or Service Charges by selecting a proper account, class, and date as per your preference.

Step e) For the purpose of continuing the procedure, Click Continue. This will open Account Name pop-up window.

Step f) Here, you have to place a tick-mark in the Hide Transactions After the Statement’s End Date for introducing a factor of ease to the reconciling procedure.

Step g) Now, place an individual tick-marks against to the cleared Checks, Payments, Deposits and other available Credits that you are willing to include in the statement, from the QuickBooks financial institution.

Step h) Click Reconcile Now, if the difference is 0.00, as this is demonstrating that all transactions that you had cleared, are matching to all those transactions presented by the financial institution.

Step i) Now, follow the instructions for printing reconciliation report, which is attached to the financial institution’s statement for safe keeping.

Execution of above step as indicated you can successfully reconcile bank or credit card accounts. In spite of this, if you any kind of assistance for continuing the process of reconciliation, call us at, our QuickBooks Support experts are ready to help you out for 24/7.